plugin
File > Setting > Plugins

1. Key Promoter X
마우스로 이벤트를 발생 시킨 경우 인텔리제이의 단축키를 알려준다.

2. Presentation Assistant
화면 중앙 하단에 자신이 클릭한 단축키 설명

3. RestfulHelper
Ctrl + \ 키로 서블릿 경로 Request Mapping 만으로 검색하여 찾아감

4. iBATIS/MyBatis mini-plugin
Mapper Class 에서 타고 들어가고 싶은 메서드에서
[ Ctrl + Alt + B ] 단축키로 mapper.xml id 를 찾아감

5. Grep Console

6. Writerside
Edit Custom VM Options
xml
# Custom IntelliJ IDEA VM Options
# https://blog.ddoong2.com/2019/07/29/IntelliJ-IDEA-옵션/
# https://snow-line.tistory.com/34
-server
-Xms4096m
-Xmx4096m
-XX:NewRatio=3
-Xss16m
-XX:+AlwaysPreTouch
-XX:+TieredCompilation
-XX:ReservedCodeCacheSize=240m
-XX:SoftRefLRUPolicyMSPerMB=50
-XX:+UseCodeCacheFlushing
-Dsun.io.useCanonCaches=false-ea
-XX:CICompilerCount=2
-Dsun.io.useCanonPrefixCache=false
-Djava.net.preferIPv4Stack=true
-Djsse.enableSNIExtension=false
-Djdk.http.auth.tunneling.disabledSchemes=""
-XX:+HeapDumpOnOutOfMemoryError
-XX:-OmitStackTraceInFastThrow
-Djdk.attach.allowAttachSelf=true
-Dkotlinx.coroutines.debug=off
-Djdk.module.illegalAccess.silent=true
-XX:+UseCompressedOops
-Dfile.encoding=UTF-8
-XX:+UseG1GC
-XX:ErrorFile=$USER_HOME/java_error_in_idea_%p.log
-XX:HeapDumpPath=$USER_HOME/java_error_in_idea.hprof
intelliJ (bin/idea.properties)
idea.config.path=${idea.home}/.IntelliJIdea/config
idea.system.path=${idea.home}/.IntelliJIdea/system
idea.plugins.path=${idea.config.path}/plugins
idea.log.path=${idea.system.path}/log
한글깨짐
Console에서 한글이 깨지는 경우
Ctrl + Shift + A 단축키 입력 후
Edit custom VM 입력 후 선택
-Dfile.encoding=UTF-8

IntelliJ 재실행
* 설치시 Edit Custom VM Options 경로
C:\Users\{user}\AppData\Roaming\JetBrains\IdeaIC2022.1\idea64.exe.vmoptions
한글Encoding 설정
CTRL + ALT + S 로 IntelliJ Settings 메뉴 호출

Editor > File Encodings 로 이동
Global Encoding: UTF-8
Project Encoding: UTF-8
Default encoding for properties files: UTF-8 (.properties 파일)
Transparent native-to-ascii conversion 체크
System Settings
File > Setting > System Settings
Reopen projects on startup 체크해제

File > Setting > Updates
Check IDE updates for
Check for plugin updates
Show What's New in the editor after an IDE update
Font
File > Settings > Editor > Font > ConsolasTerminal (cmd to git bash)
bash
File > Settings > Tools > Terminal
Application Settings > Shell path > 변경후 > OK > IntelliJ 재시작

# 변경전
powershell.exe
# 변경후
"C:\Program Files\Git\bin\sh.exe" -login -i
Inlay Hints
File > Settings > Editor > Inlay Hints > Code vision 체크 해제Line Number, Whitespce
File > Settings > Editor > General > Appearance
Show line numbers(check)
Show whitespaces(check)
Font SizeLine Number
File > Settings > Editor > General > Change font size with Ctrl + Mouse Wheel (Check)Diff & Merge
FIle > Settings > Editor > Color Scheme > Diff & Merge > Change
385570, 43698D  => 294436, 447152
intellij git 설정
Compact References View (check)
Align References to the Left (check)
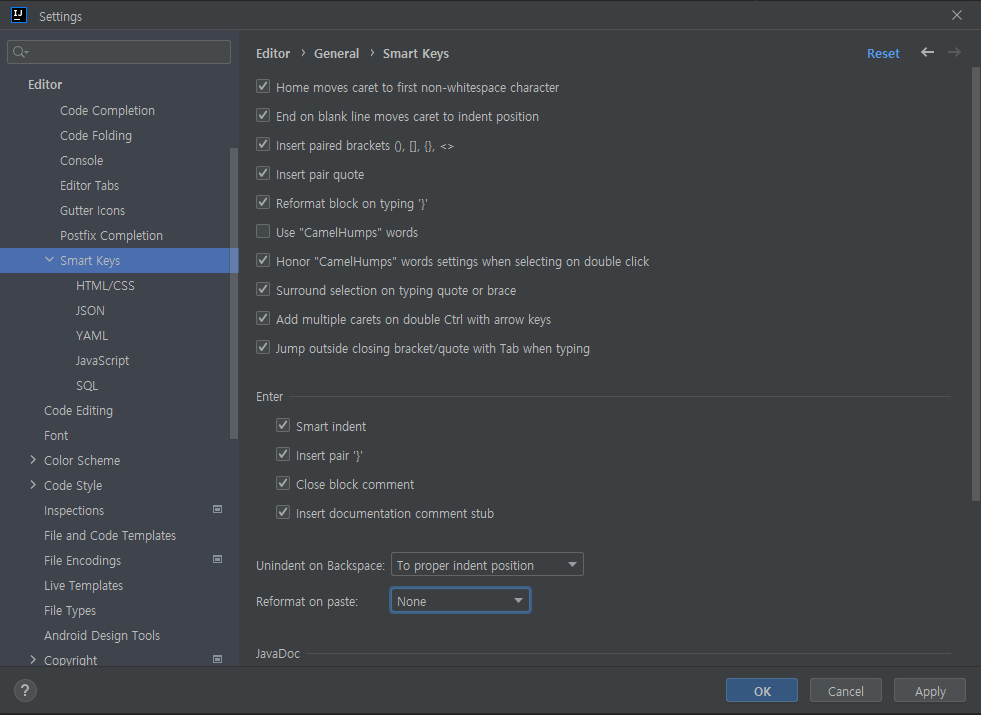
Show Tag Names (check)IntelliJ 복사 붙여넣기 시 들여쓰기가 유지되지 않을 경우
File > Settings > Editor > General > Smart Keys >
Reformat on paste 설정 None 또는 Indent block로 변경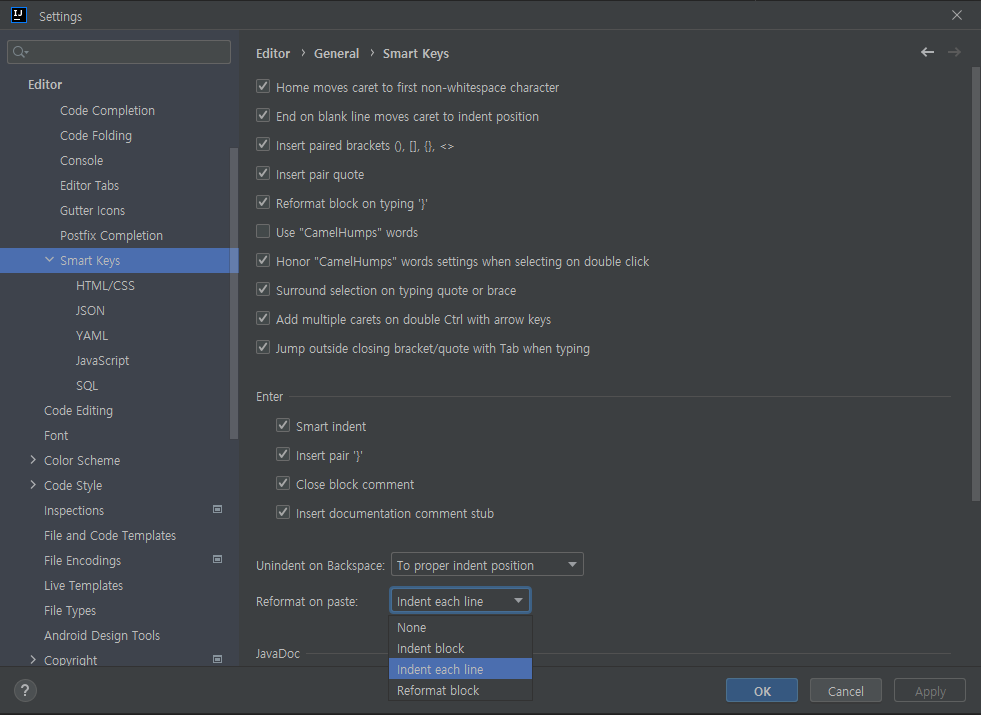
jdbc drivers location
C:\Users\${user}\AppData\Roaming\JetBrains\IntelliJIdea2022.1\jdbc-drivers\Oracleplugin Database Navigator
File > Settings > Plugins > Database NavigatorData Source와 SQL Dialect 옵션 해제, 배경색 제외
File > Settings(Ctrl + Alt + S) > Editor > Inspections > SQL - No data sources configured, SQL dialect detection 체크 해제
File > Settings(Ctrl + Alt + S) > Editor > Color Scheme > General > Code - Injected language fragment - Background 체크 해제
SQL Dialect
노란줄이 나타나는 경우
File > Settings > Languages & Frameworks > SQL Dialects
Global SQL Dialect: Oracle (자주 사용하는 설정으로)
Project SQL Dialect: Oracle
mapper 구현체로 이동
ctrl + alt + b구현체 제외
검색시 ctrl + shift + n 사용 (모두를 할경우 전부 나옴)Maven Project Setting
File > Project Structure
Project Settings > Project > SDK > 선택 > Apply
Platform Settings > SDKs > + > Add JDK

File > Settings
Build, Execution, Deployment > Build Tools > Maven
Use settings from .mvn/maven.config 체크해제 > User settings file에서 선택 > Apply

Run > Edit Configurations
+ > Tomcat Server > local

Deployment Tab > + > Artifact > Select Artifacts to Deploy에서 project명:war exploded 선택
Application context 설정 /

Server Tab
Application server > Tomcat Server > Tomcat Home 설정 > 원하는 톰캣 선택 후 확인
On 'Update' action: Update classes and resources (핫 리로드옵션 project명:war exploded여야함)
On frame deactivation: Update classes and resources (핫 리로드옵션 project명:war exploded여야함)
VM options: -Dfile.encoding=UTF-8
JRE: 1.7
Tomcat Server Settings : HTTP port: 8080
Database
Database탭 > + > Oracle 선택
설정 후 Test Connection > Driver 다운로드
Project Java version 변경
Project Structure창 (단축키 : SHIFT+CTRL+ALT+S)
* Project
1) SDK 변경
2) Language Level 변경
* Module
3) Language Level 변경
* SDKs
4) 원하는 JDK를 선택한다(JDK는 한 폴더에 모아두는것을 추천!)

Setting (단축키 : CTRL+ALT+S)
* Build,Execution,Deployment  -> Build Tools -> Gradle
5) Gradle JVM 변경
* Build,Execution,Deployment  -> Compiler -> Java Compiler
6) Project bytecode version 변경
vmoptions
사용자 옵션 변경 C:\Users\{user}\AppData\Roaming\JetBrains\IntelliJIdea2022.2\idea64.exe.vmoptions
전체 옵션 변경  C:\Program Files\JetBrains\IntelliJ IDEA 2022.2.3\bin\idea65.exe.vmoptions
-Xmx2048m
-Dfile.encoding=UTF-8
-Dconsole.encoding=UTF-8
-Duser.language=en -Duser.region=US
-Duser.language=ko -Duser.region=KR
Java SDK 설정
File > Project Structure 선택
Project Settings > Project > SDK 클릭 > Add SDK
IntelliJ 빌드/실행 플랫폼 변경 및 소스코드 자동반영 설정
File > Build, Execution, Deployment > Compiler
Aumomatically show first error in editor 체크
Build project automatically 체크

File > Advanced Settings
Allow auto-make to start even if developed application is currently running 체크
IntelliJ live templates
https://velog.io/@max9106/IntelliJ-Live-TemplateIntelliJ Community Tomcat 설정
1. smart tomcat 플러그인 추가
2. Java 설정
    File > Project Structure
    Project Settings > Project > SDK > 선택 > Apply
    Platform Settings > SDKs > + > Add JDK
2. Maven 설정
    File > Settings
    Build, Execution, Deployment > Build Tools > Maven
    Use settings from .mvn/maven.config 체크해제 > User settings file에서 선택 > Apply
3. Edit Configurations
    Run > Edit Configurations
    + > Smart Tomcat

    Tomcat Server: 톰캣 추가
    Deployment directory: ~/project/src/main/webapp
    Use classpath of module: project
    Context path: /
intellij Could not initialize class oracle.jdbc.driver.OracleDriver
~/project/src/main/webapp/WEB-INF/lib 로 ojdbc6.jar 파일을 넣어서 처리tomcat version 확인
cd {tomcat_dir}\lib
java -cp catalina.jar org.apache.catalina.util.ServerInfo
tomcat encoding
{tomcatfolder}\conf → server.xml
<Connector port="8080" protocol="HTTP/1.1"
            connectionTimeout="20000"
            redirectPort="8443" />

<Connector port="8080" protocol="HTTP/1.1"
            connectionTimeout="20000"
            redirectPort="8443"
            URIEncoding="UTF-8"
            />
File .mvn/wrapper/maven-wrapper.properties not found. The Maven bundled version will be used instead.
gradle embedded tomcat SSL 설정
xml
server:
  port: 10021
  ssl:
    enabled: true
    key-store: Wildcard.test.co.kr.jks
    key-store-password: "test1234"
    key-store-type: jks
bookmark 복원
1. {project}/.idea/workspace.xml > ProjectId 찾기
<component name="ProjectId" id="2UeEwbr6xtjdTVsr33737oDAYp4" />

2. ProjectId의 xml로 북마크 복사
C:\Users\osryu\AppData\Roaming\JetBrains\IntelliJIdea2022.1\workspace
Remote Debugging
bash
-agentlib:jdwp=transport=dt_socket,server=y,suspend=n,address=5005

java  -Xms2g -Xmx2g -agentlib:jdwp=transport=dt_socket,server=y,suspend=n,address=5005 -Dfile.encoding=UTF-8 -Dconsole=true -jar drawing-app.war --spring.profiles.active=prod
[error] java: Compilation failed: internal java compiler error
File > Settings > Build, Execution, Deployment > Compiler > Java Compiler
Use compiler: Javac => Eclipse
intelij memory Debugging
xml
# https://americanopeople.tistory.com/428
View > Tool Windows > Profiler > Cpu and Memory Live Charts
intellij Project panel font size
File > Settings > Appearance & Behavior > Appearance
1. Use custom font: Size를 수정시 전체 UI 적용됨
2. UI Options > Use smaller indents in trees 체크
intellij Hot Swap , Hot Reload
bash
# Spring Boot에는 live reload (페이지 수정없이 반영되는 것) Spring Legacy 5부터 가능함 (Live Reload 플러그인 설치)
# Spring Boot에서 는 class 변경시 다시 로딩하는데 시간이 조금 걸림, Spring Framework는 class를 조금더 빠르게 반영됨
# Mybatis의 xml은 처음 로드할때 적용되므로 수정시 반영이 안되나, RefreshableSqlSessionFactoryBean를 사용해서 Reload를 할수 있도록 할 수있음
# Hot Swap (java=> class reload) ctrl + shift + F9
# Hot Reload (resources reload)
# Mybatis xml Reload (RefreshableSqlSessionFactoryBean)
# https://hskhsmm.tistory.com/entry/spring-boot-devtools-hot-reload
# CRM(Spring Framework): xml 리로드 가능, class리로드 (빠름) 가능
# FO(Spring Boot): xml 리로드 (안해봄) 모름, class리로드 (재시작보단빠르나 느림) 가능